Of the many things you’ll need to manage for yourself in life at some point — and if you’re a person in your teens or twenties, probably need to already do to some degree or will need to start doing soon — managing your own healthcare may be one that feels particularly complex, all the more so if you’re disabled or chronically ill. In an era where healthcare systems around the world, be they private or public, keep becoming increasingly more difficult to access and navigate, and where what care we can access and how we access it may be threatened, limited or in a state of flux, it can all feel especially overwhelming.
That’s why we created this customizeable-to-you toolkit to help you organize, chronicle, sort through, and communicate your healthcare needs for yourself and anyone else involved in the care and keeping of you and your body. It’s only going to be full of the information about you, your health, and everything involved that you provide. You can change up any headings or sections that don’t work for you, and you can use this in digital spreadsheet, digital or word document, printed or DIY-journaling form, whichever works best for you.
You can also think about this toolkit as a way of organizing some parts of your care web, a personal community and living system of care and support. The idea of care webs generally positions them as being about mutual or reciprocal support, and you may have roles in your own care web that are about the help you give others. This is for the care, and supports for that care, that you need, and a tool for you to organize your own care.
The three of us who’ve co-created this are all people who have long had varied, ongoing and complex healthcare needs. One of us gets their care through a national healthcare system, and two of us have used public health and private insurance. The form itself is even based on the form one of us — s.e. — created for himself and still uses to manage his own care.
Your health information is personal and private, so it’s important to do the best you can to keep the kind of information you’ll put in this form as private as you can, keeping it only for yourself, deeply trusted people in your life, and your healthcare team. Especially in this era, some aspects of our health information may present risks for us if shared, things like our mental health or reproductive health history, or, if we’re trans or otherwise gender-nonconforming, our gender identity or assigned sex at birth.
We suggest you use and keep this form only in secure places, like your own desktop with its own software, rather than something like Google Docs or Sheets. But ultimately, where you use it will be up to you, based on what works best for you and what you feel comfortable with.
This isn’t something to do once and figure is done forever.
Think of this as a living document, one that you’ll be adding to and changing as you need to, and probably more often rather than less if you have any chronic or ongoing conditions. The more current you keep it, the more helpful it can be for you and your healthcare providers. You can use it with them either by printing out any or all of it you want to share, or by bringing some version of it with you during appointments, so you have all of your own information on hand to do things like fill out intake forms or report side effects of medications.
Particularly if you haven’t filled out something for yourself like this before, or if your health history or current needs are long and complex, it might feel a little overwhelming to fill this out the first time. If you have a supportive parent or other adult who has been managing your healthcare up until now, filling this out with them may make some parts of it easier, since they may remember things you don’t or have access to health records you don’t yet have full access to. If your healthcare has been or is documented through a patient portal or other secure online recordkeeping system, it absolutely will be easiest to fill some of this out by having that open and using it for reference. If you have one but don’t have your own access to it yet, this is a great time to ask your parent(s) or guardian(s) to get you set up with that access, something you’ll need to manage your own healthcare with or without this form.
You also, by no means, have to get this whole thing set up in one sitting: you might want to make things easy on yourself by doing a little bit each day across a week or so, instead.
Once it’s done, printing a copy out for yourself and/or saving it in a secure place in digital format on your phone is a great way to assure you always have a copy on hand for things like doctors’ visits, pharmacy concerns, or hiring or training any needed aides.
Which version to start with:
- Document Version – This is the best option if you want to work on this digitally but also print out whenever you need. To open and edit .docx files, you can use: Microsoft Word (Mac/Windows), Mac Pages (Mac), Libre Writer (Mac/Windows/Linux), or Google Docs (ChromeOS - in offline-mode, if possible).
- Spreadsheet Version – This is the best option if you only want to work on the toolkit digitally. If you ever want to print your work, you will need to copy paste the tables (or parts of tables) into a word processor yourself to make sure everything fits on the page. To open and edit .xlsx files, you can use: Microsoft Excel (Mac/Windows), Libre Calc (Mac/Windows), Mac Numbers (Mac) or Google Sheets (ChromeOS - in offline-mode if possible).
- PDF version – This is the best option if you want to print a template which you can fill-out by hand. To open and edit .pdf files, you can use: Acrobat Reader (Mac/Windows), Mac Preview (Mac) or Okular (Cross-Platform).
- DIY/analog version – This is the best option if you want to curate your own experience more and are feeling creative, and/or don’t have access to a printer.
To create your own DIY and analog version of the toolkit, you can do whatever you like! However, one option could look like this:
- Download the PDF version of the toolkit to get an idea of what sections and column headers you will need.
- Buy yourself a notebook with dotted or squared paper.
- Divide up your notebook for each section of the toolkit. Remember to account for the fact that some sections will need fewer pages than others (“About me” for example, could be just one or two pages total. You’ll always want to leave extra pages between sections, even for these shorter and less-changeable bits, because any of this information can always change. You’ll particularly want to leave extra pages for the sections about your medical history and your healthcare visits.
- Fold or cut down pages so you don’t need to repeat column headers.
- Stick color-coded tabs/clips on each section divider.
- Draw any vertical column dividers.
- Add an example row to each table so you don’t have to remember which kinds of information to include (you can refer to the PDF as an example).
- Add any stickers or decorations you like!
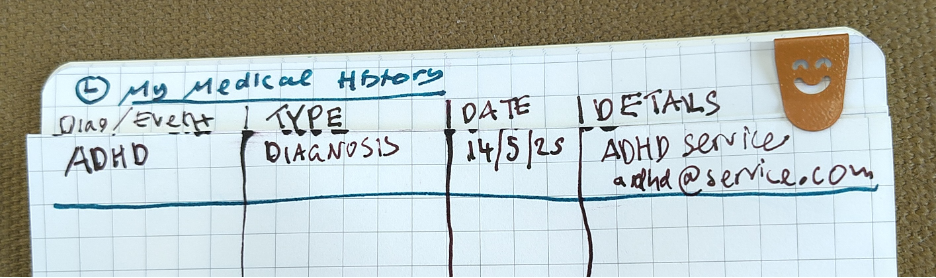
This is your toolkit, so it can be as elaborate or as simple or as neat or as messy as you like. The image here is Jacob’s attempt, which uses a tiny passport-sized notebook, and is a messier type, rather than a very stylized or more uniform look, but yours can be however you like it!
All versions are downloadable below as attachments.
| Attachment | Size |
|---|---|
| DOCX version for direct editing and printing | 298.89 KB |
| PDF version for printing and filling out by hand | 411.93 KB |
| XLSX version for adaptable digital-only usage | 57.33 KB |